
📊 감정별 통계 기능 구현하기 (EmotionStats) 🚀
이번에 감정 일기장에 감정별 통계 기능을 추가했다!
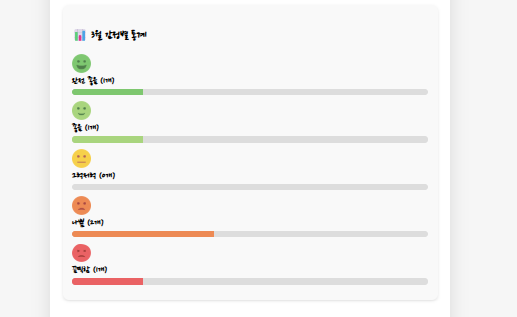
이제 월별로 각 감정이 몇 개씩 있는지 한눈에 볼 수 있다.
1️⃣ 📌 구현 목표
✅ 감정별 PNG 이미지 표시
✅ 감정별 개수를 막대그래프(Progress Bar)로 표현
✅ Home.js에서 월별 데이터를 받아서 통계 반영
✅ 감정별 상태바 색상 추가로 시각적으로 개선
2️⃣ 🛠 EmotionStats.js (통계 컴포넌트)
먼저, EmotionStats.js에서 감정별 개수를 계산하고 막대그래프 + 감정별 PNG 이미지를 추가했다.
import "./EmotionStats.css";
import { getEmotionImage } from "../util/get-emotion-image";

const getEmotionStats = (data) => {
  const stats = data.reduce((acc, item) => {
    acc[item.emotionId] = (acc[item.emotionId] || 0) + 1;
    return acc;
  }, {});
  return stats;
};

const emotionColors = {
  1: "rgb(100, 201, 100)",
  2: "rgb(157, 215, 114)",
  3: "rgb(253, 206, 23)",
  4: "rgb(253, 132, 70)",
  5: "rgb(253, 86, 95)",
};

const EmotionStats = ({ data, month }) => {
  const stats = getEmotionStats(data);

  return (
    <div className="emotion-stats">
      <h3>📊 {month}월 감정별 통계</h3>
      {[
        { id: 1, label: "완전 좋음" },
        { id: 2, label: "좋음" },
        { id: 3, label: "그럭저럭" },
        { id: 4, label: "나쁨" },
        { id: 5, label: "끔찍함" },
      ].map(({ id, label }) => (
        <div key={id} className="emotion-bar">
          <div className="emotion-info">
            <img src={getEmotionImage(id)} alt={label} className="emotion-img" />
            <span>{label} ({stats[id] || 0}개)</span>
          </div>
          <div className="bar">
            <div
              className="fill"
              style={{
                width: `${(stats[id] || 0) * 20}%`,
                backgroundColor: emotionColors[id],
              }}>
            </div>
          </div>
        </div>
      ))}
    </div>
  );
};

export default EmotionStats;
✅ getEmotionImage(id)로 감정별 PNG 이미지 표시
✅ emotionColors 객체로 감정별 색상 설정
✅ fill의 width를 감정 개수에 맞게 조절
3️⃣ 🏡 Home.js에서 EmotionStats 추가
이제 Home.js에서 월별 데이터를 받아서 EmotionStats에 넘겨줌.
<EmotionStats data={monthlyData} month={pivotDate.getMonth() + 1}/>
✔ 현재 월(pivotDate.getMonth() + 1)을 EmotionStats에 전달
✔ 월별 감정 개수를 계산해서 표시
4️⃣ 🎨 EmotionStats.css (스타일 적용)
이제 막대그래프(fill) 애니메이션 & 감정 이미지 스타일을 추가했다.
.emotion-stats {
  margin: 20px 0;
  padding: 15px;
  border-radius: 10px;
  background-color: #f9f9f9;
  box-shadow: 0px 2px 5px rgba(0, 0, 0, 0.1);
}

.dark-mode .emotion-stats {
  background-color: #333;
  color: white;
}

.emotion-bar {
  margin: 10px 0;
}

.emotion-bar span {
  display: block;
  margin-bottom: 5px;
  font-weight: bold;
}

.bar {
  width: 100%;
  height: 10px;
  background-color: #ddd;
  border-radius: 5px;
  overflow: hidden;
}

.fill {
  background-color: black;
  height: 100%;
  transition: width 0.5s ease-in-out;
}

.emotion-img {
  width: 30px;
  height: 30px;
  object-fit: cover;
}
✅ fill에 부드러운 너비 애니메이션(transition) 적용
✅ 감정 이미지(emotion-img) 크기 & 정렬 설정
5️⃣ 🔥 개선할 만한 추가 기능 아이디어
✅ 1. map() 최적화
지금은 감정 리스트를 직접 배열에 하드코딩했는데,
이걸 최적화해서 더 깔끔하게 관리 해보고자 함.
✅ 2. getEmotionStats()에서 감정 개수 비율 계산
getEmotionStats()에서 전체 개수 대비 감정 비율(%)을 적용해 나타내 볼 것.
✅ 3. 감정 개수에 따라 상태바 최대 길이 제한
현재 width: ${(stats[id] || 0) * 20}% → 개수가 많으면 바가 너무 길어질 수도 있음!
👩💻간단 회고
1. reduce()를 활용한 감정 개수 계산 방식이 숙련됨.
2. 이미지 적용방식 (import, util함수)에 대한 고민 & 최적의 방법 선택
3. "단순한 숫자 통계" 보다 "직관적으로 정보를 전달하는 UI" 가 중요하다는 걸 느낌!
🎯 최종 정리
✔ 감정별 PNG 이미지 추가 (getEmotionImage(id))
✔ 막대그래프(fill)로 감정 개수 시각화
✔ 상태바 감정별 색상(emotionColors) 적용
✔ 월별 통계 표시 (month prop 전달)
🔥 이제 감정 일기장이 더 직관적이고 예뻐졌다! 🚀
🔥 다음으로 map() 최적화, 비율 계산 추가해서 더 개선해보려고 함.

'혼자 이것저것 공부해보는 > 감정 일기장' 카테고리의 다른 글
| [추가 업데이트] 감정별 일기 필터링 기능 구현하기 (0) | 2025.03.12 |
|---|---|
| [감정 일기장] 웹 스토리지 이용하기 (1) | 2025.02.13 |
| [감정 일기장] Diary 페이지 구현하기 (0) | 2025.02.12 |
| [감정 일기장] New 페이지 구현하기 2. 기능 (1) | 2025.02.10 |
| [감정 일기장] New 페이지 구현하기 1. UI (0) | 2025.02.09 |